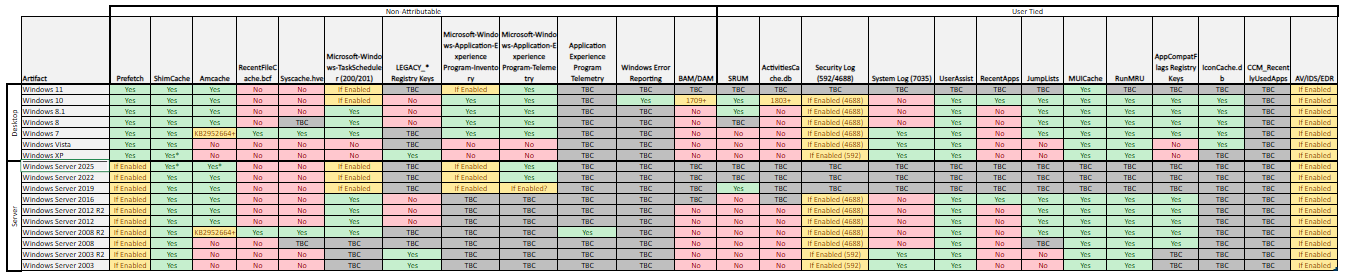
2019-11-28

CyberThreat 2019 Badge Writeup

Last year I was lucky enough to attend the inaugural CyberThreat conference put on by NCSC and SANS and it was also the first time I was introduced to interactive badges at a conference.

CyberThreat 2018 Badge
The badges formed the bases of a CTF, which was one of the highlights from the event as far as I was concerned. Despite a concerted effort during the 2 day conference nobody was able to complete the CTF before close-down, however I was pleased to find out when I completed it 2 hours after the event had ended that nobody had beaten me to the chase and I could claim the prize.

For those interested, a video walkthrough from James Lyne (@jameslyn) and Simon McNameee (@mcnamee_simon), that details the various stages, is available below:


Unsurprisingly having secured a place at CyberThreat 2019 and having seen various comments suggesting that the badges were going to be bigger and better than last year, I was excited to have a play.

This year, rather than being a mere two hours late, it was a full two days after the conference had closed before I was able to complete the final challenge. I don't think I will have been the first, but nevertheless it was good fun.

What follows is a brief write up of the process followed, with much of the error excluded and much of the luck written to make it sound like I have more of a clue than I do.


The Badges

This year the badges had clearly had something of an upgrade:

CyberThreat 2019 Badge
The single button input and 4 LED output were now upgraded in a GameBoyesque fashion. An LCD with configurable display Name/Alias, timeout and backlight colour, as well as SDCard and multiple input buttons, made for a considerably more versatile interface for challenges.

Within the device you had a basic menu which offered 'Settings' or 'Challenges', the latter of which was the CTF with 5 unlockable challenges:

Challenge List


Getting Started

It's probably worth pointing out that before starting the CTF, I immediately dropped the SD card out of the badge and imaged it, because I'm a forensicator and that's what forensicators do right!? But, as I had suspected it might, this proved to be handy later.

Further to this, throughout the CTF I had the badge connected via USB and was monitoring it over serial using my computer. This was based on my previous experience from last year, where all interaction with the badge occurred in this way.

Connecting to the badge can be achieved in a number of ways but the first requirement is to identify the correct COM port.

In Windows:
Within device manager, after connecting the device via USB we can review what ports are in use:

Device Manager

In this case COM5.

In Linux:

There are a number of ways to confirm this but I generally grep dmesg for 'tty' after connecting the device.

dmesg | grep tty

Once we know the COM port in use we can use Putty, Arduino IDE, screen, python serial or a myriad of other methods to communicate with the badge. I found Arduino IDE with 9600 baud to be reliable for interactive needs, screen via WSL was also helpful and for later challenges pySerial was needed.


Level 1 - Maze Madness

The first level 'Maze Madness' presents you with a current location, goal location, a score and the simple instruction "Press 'A' to move!".

Maze Madness - Just before completion
Being the suspicious type, I promptly tried every button other than A, and quickly learned that B exited the game and no other buttons did anything noticable. I also tried the 'Konami Code' but was not rewarded with the instant win I had hoped for...

Next up I pressed the 'A' button and found that my location changed. Spamming it a few times seemed to move the coordinates seemingly randomly with any 1 press resulting in either X+1, X-1, Y+1 or Y-1. When pressing the button repeatedly it became apparent that the direction of movement was rotating North, East, South, West and that quick repeated presses and pauses could be used to move the Location in the rough direction desired.

Following some patience and luck I was eventually rewarded with my first win!

A winner is me


Level 2 - Close Proximity

Level 2 presented the player with a scrollable wall of hex, which in the case of my badge was 3 screens worth (192 bytes).


Notably we also see communication over the serial interface we are monitoring with a simple request to enter a password.


After I had recovered from the SEC503 flashback that being presented with a surprise wall of hex tends to induce, I began the process of transcribing the values so I could work on determining what they represented. Incidentally, if you are a CTF author and you are considering having participants transcribe 384 characters... don't.

Typing this out was ace

Once we look at the ASCII representation of the hex a few things jump out.

Firstly we can see "Adam H harrisonamj" as well as some other sub-strings of the same (presumably resulting from multiple changes to the names I configured on my badge).

We also see references to 'BKRGB', 'NAMES', 'CHALL', 'KEY' and 'FLAG'... and we all like flags. What we have between offset 80h and B0h is a "page directory esque structure"...


Based upon the need for this question to ultimately be explained to the conference, and the hints posted to social media, I think it is safe to assume this leap was not made by everyone (myself included). What I do know, is that Bastien Lardy (@BastienLardy) managed to figure it out and crack this challenge well before the big reveal, and I know this because he had to help me realise the mistake I was making...

Putting that aside if we interpret the values beside our interesting references we get the following:


I would love to pretend that I took one look at the data and saw a the structure and it all made sense immediately but my somewhat convoluted method of getting from here to the answer was as follows.

We have a known data location, 'NAMES' which appears to populate 32 bytes and per the directory has a size of 2 and a location of 254. We can use this to derive that a size unit within the table is 16 bytes. We are going to be interested in the FLAG because this is a CTF so working from NAMES we can determine that the flag is the 16 bytes starting at 10h.

Noting that we have text input available via the serial interface we can throw that in there and quickly learn that this is not what the device is looking for...

Back to the drawing board... We also have a 'KEY' value from the table which can be found at 20h and is also 16 bytes. Things which are the same size are fun to XOR against each other right!?

Using CyberChef we can take the 'FLAG' value, convert it from hex and XOR it against the 'KEY':


One good indication that the values you selected were correct will be that the resultant output is an Ascii string. This can then be sent to the device over serial in response to the "waiting for password" prompt and will result in level completion.


Level 3 - Warped Wordlist

I earlier mentioned that I had imaged the SD card and had a poke around, the first thing which jumped out at me was 'wordlist.txt' at the root of the storage device. NB. no image is required you can directly access this but it never does any harm to have a full backup of the storage device.


A quick examination of the file identified that it contained a list of 50 words. Further, when I compared this wordlist with others, it appears we all had the same list.

Now on with the challenge... The screen on the device simply stated 'Password Required!' making the next step to review how the device presented over serial and see if that provided any clues:


Well I guess we better try those passwords... so type each one individually...

Alternatively we could script the consumption and sending of the wordlist using Python.

Due to the initiation of the serial connection causing the badgeto restart you either need to use the Python IDE to manually enter the commands at the right moment, or you can use a script which pauses at the appropriate moment:

import serial 
ser = serial.Serial('/dev/ttyS4',timeout=1) 
raw_input("Press Enter once you have reopened game") 
ser.read(1000) 
file = open("/mnt/d/wordlist.txt") 
for x in file:
    print x
    ser.write(x.encode())

Unfortunately, nothing is ever that simple. The wordlist on it's own wasn't adequate. I generated a number of other wordlists in an effort to generate a "warped wordlist", this included reversing strings, converting to leetspeak, encoding the strings in various ways. But ultimately what worked was using rsmangler within Kali to generate a new mangled wordlist:

rsmangler -a -d -p --file wordlist.txt --output mangled_wordlist.txt
When the resultant list was used with the same Python script, this time we were on to a winner.


Level 4 - Jargons Attack!

Launching the Level 4 game resulted in 'I'm thinking of a word!' being output on serial but it was obvious from the game screen that the intention was for the answer to be supplied via the device.


Each time the game was quit and restarted a new seemingly random string of letters was presented. It would see that this was a crackable code of some description.

The first task I undertook was to repeatedly open the game and start noting down the strings which were presented. After 10 or so attempts I had made the following observations:

  • All 'words' appears to be roughly the same length (so far)
  • All words consisted of upper case English/Latin alphabet but some also contained another character ( similar to [)
  • There was word repetition
I proceeded to patiently repeat this exercise and noted down each unique words I observed, populating a text file with the words and using 'cat | sort | uniq' to provide a master list I could check against. Ultimately I started to get close to 50 words in the list which was notable because the wordlist we have already seen contained 50 words.

I performed a number of simple tests, which included comparing the character count between the two word lists:


This made it clear that there was not a simple character substitution going on. But undeterred I analysed the word lengths in my two lists:

awk '{ print length }' game.txt | sort | uniq -c
    17 10
     9 11
     2 12
     9 8
    13 9
awk '{ print length }' wordlist.txt | sort | uniq -c
    16 10
    10 11
     2 12
     9 8
    13 9

Now we are onto something... and what we are onto is the fact that I had a typo in my list...

Once that was reviewed and fixed I had a perfect match for word length distribution which was very interesting. Further when I sorted both alphabetically it became apparent that the first letter frequency was the same for each:
2 x A
5 x B
2 x C
3 x D
etc...

Next I loaded the two lists into excel side by side and using the unique letter counts within each letter set, I started pairing them up, which looked roughly like this:


There is undoubtedly a more scientific approach which would allow for the full listing to be paired up, but for the purposes of completing the game, only one match was needed so the approx 50% I had completed was more than enough.

I fired up the game again and saw that the word I was prompted with was in my new dictionary, typing in the corresponding word from the wordlist.txt file with the badge text entry method resulted in completing the level successfully.


Level 5 - Quirky Quarks

Launching this challenge you are presented with a 'File Not Fount!' error on the screen of the device:


But more notably, over serial we get:


After initially throwing a few commands such as 'dir', 'ls', 'flag' etc I finally swallowed my pride and tried 'help', which was helpful:


As with Level 4, when spelunking through the SD card I had already noticed something notable again I had already stumbled upon a component of the game earlier. So it was no surprise when I selected the list command and saw 'QUARK.HEX' which I had already had a play with. I also noted a file named '_FILE~1.HEX ' but this turned out to be a red herring.

I had already copied QUARK.HEX from the SD card earlier and noted that it was an ASCII file containing HEX values and that the first characters were '7f454c46'. You can even use the inbuilt 'read' command to establish this. '7f454c46' is the file signature associated with an ELF executable so if we exported the ASCII content of the file and interpreted it as hex it looks like we would have an ELF on our hands.

I am sure there is a jolly clever way to do this on the command line, but I opened up QUARK.HEX in Sublime Text, copied the contents and pasted into 010 using the Edit > Paste From > Paste from Hex Text feature.

Once I had saved this out (in my case named 'bin') I had an ELF which I could execute. So I did:


Obviously it wasn't going to be that easy. So I undertook my traditional 3 stage reverse engineering process:

  1. Use strings
  2. Open in IDA, cry and promptly close
  3. Ask Charlotte (@gh0stp0p) to do it for me.

Strings wasn't giving up any clues:


IDA had the expected result:

I Cried
So did BinaryNinja:
Why do I even bother looking
But the real kicker was when my go to backup option went as follows:

Ouch
Reverse Engineering is very far from my strong point, and as such a lot of guess work occurred. I persisted down all conceivable rabbit hole until I settled on the fact that I would have to work with this binary somehow. I ran the executable within gdb and determined that despite no effort to learn since I last tried to use gdb I still have no clue what I am doing.

A quick strace to see what was happening before the error resulted in the following:


What we see in the first line before the error is printed is the use of 'getcwd' to fetch the current working directory. I'm not going to lie, this may he the case in every program but it got me thinking that the executable may want to be run from a certain location.

Looking back in the hex of the file we can see what looks like a file path, towards the end of the file. This was missed when we ran strings earlier due it the encoding.


If we run strings again we can pick out the unicode string by adding '-e l':


So we create the requested directory structure, move the executable 'bin' into it and run it from there using the below commands:
mkdir /tmp/quarkmkdir /tmp/quark/fileexistsmv bin /tmp/quark/fileexists/cd /tmp/quark/fileexists/./bin
We note that we do not get an error, and if we 'ls' the current directory we have a new file:


Ultimately this is an empty file. But all that matters is the filename. I proceeded to copy the file, preserving it's metadata into multiple locations on the SD card in an effort to see if it's presence would cause a win state in the game. However, subsequent testing shows it is as easy as using the file manager tool within the badge to create a file of that name...


And...


Massive thanks to the guys who put the effort into the badges this year, it made for a fun challenge and I've been inspired to do some playing on the firmware side to see what can be achieved.

2019-08-15

2019 Unofficial Defcon DFIR CTF Writeup - Linux Forensics


When completing this portion of the CTF I relied upon Autopsy 4.12 heavily, using the CTF as an opportunity to practice and trial a different toolset/ approach. In general I was impressed, but I’m not an Autopsy user day to day and as such I was fumbling a fair bit. For the Linux portion of the challenge, in hindsight, I think mounting the image within a Linux distribution would make more sense. For that reason, in this writeup I have addressed how to solve the questions using SIFT.

You can mount the image under sift, using the ewfmount command:
sudo ewfmount /mnt/hgfs/Cases-ssd/Evidence/Adam\ Ferrante\ -\ Laptop-Deadbox/Horcrux/Horcrux.E01 /mnt/ewf
The new file object is named ewf1:


This presents the E01 as a raw file which can the be mounted with a loopback device. First, we need to establish where the partition of interest is located and to achieve this I use ‘mmls’:
mmls /mnt/ewf/ewf1
This provides the below output:


We can see that “Units are in 512-byte sectors” and that the start offset of the Linux partition is 75560960. Multiplying these together we get ‘38687211520’ which is the byte offset we will use for mounting the partition. First I created a directory to use as a mount point, with:
mkdir /mnt/linux_mount
Then using the mount command, we can mount the partition read only:
mount -o ro,loop,offset=38687210496 -t ext4 /mnt/ewf/ewf1 /mnt/linux_mount
Or not…


The error above can result from a number of things, however in this case it is because the filesystem is dirty. When mounting the drive it attempts to rectify the issue, which cannot be performed with a read only mount. We can overcome this issue by passing the ‘norecovery’ option when mounting:
mount -o ro,norecovery,loop,offset=38687211520 -t ext4 /mnt/ewf/ewf1 /mnt/linux_mount
This worked without error and if we 'ls' the new mountpoint we can see that we now have access to the mounted filesystem:


Now we have the filesystem mounted... on with the questions!

red star - 10 pts

Question

What distribution of Linux is being used on this machine?

Answer

There are various ways to determine the distribution in use within a linux install/image. When looking at a dead image checking the contents of /etc/issue, /etc/*-version or /etc/*_version is the quickest and easiest.

A simple cat of /mnt/linux_mount/etc/*version or /mnt/linux_mount/etc/issue provides the following:


Throughout this process be careful to ensure you are targeting the mounted filesystem and not your analysis system's filesystem. I will normally navigate to the root of the target and work from there as my working directory, in this case using ‘cd /mnt/linux_mount’. Thereafter a path in the OS under analysis would be equivalent to that of being at the root of the system and we can presceed any paths with '.' to indicate that we should be starting from the current directory. the current director.e.g.:

cat ./var/log/apache2/access.log
Due to my working from the route of the mounted drive the command above will target '/mnt/linux_mount/var/log/apache2/access.log' on my analysis system.

Going back to the screenshot and the output of our commands, it looks like we are dealing with Kali.

flag<Kali>

abc123 - 10 pts

Question

What is the MD5 hash of the apache access.log?

Answer

By default the apache access log is located at /var/log/apache2/access.log. So with a working directory of the root of the mounted fs, we can use:
md5sum ./var/log/apache2/access.log
Which provides the following:


flag<d41d8cd98f00b204e9800998ecf8427e>

Radiohead - No Surprises - 10 pts

Question

It is believed that a credential dumping tool was downloaded? What is the file name of the download?

Answer

As a first step in familiarising myself with the image I reviewed the ‘/etc/passwd’ file in an effort to see what users were active and worthy of further investigation. With regard to this specific questions I was particularly interested to see which users had home directories as possible locations to have downloaded files to.

As is default in kali, the 'root' account is the only user account, and the home directory was at ‘/root’. A quick way of having an easy to review list of home directories in use is to use the following command:
cat ./etc/passwd | cut -d':' -f 6 | sort | uniq
Which results in this output:


Based on the above we will start with the ‘root’ user and it makes sense to check on the contents of the associated ‘Downloads’ folder:
ls -al ./root/Downloads/
Which results in the below:


Only one file, and it’s filename is sure does look like that of a well-known credential dumping tool.

flag<mimikatz_trunk.zip>

super duper secret - 15 pts

Question

There was a super secret file created, what is the absolute path?

Answer

Within the bash history for ‘root’ (/root/.bash_history) we see that someone piped the output of a cat command into ‘/root/Desktop/SuperSecretFile.txt’:


flag</root/Desktop/SuperSecretFile.txt>

this is a hard one - 15 pts

Question

What program used didyouthinkwedmakeiteasy.jpg during execution?

Answer

Still in the bash history we see ‘binwalk’ being used over didyouthinkwedmakeiteasy.jpg:


flag<binwalk>

overachiever - 15 pts

Question

What is the third goal from the checklist Karen created?

Answer

There is a file on the desktop for ‘root’ called ‘Checklist’, reviewing its content we see that it has three items:


flag<Profit>

attack helicopter - 20 pts

Question

How many times was apache run?

Answer

We earlier reviewed the apache access log to calculate its hash, and the eagle eyed forensicators among us may have noticed that the hash was ‘d41d8cd98f00b204e9800998ecf8427e’ which is the MD5 associated with a 0 byte file.

Reviewing the log directory, we find the same to be true of the other logs:


Most notable is the error.log as this log is populated with entries upon apache starting. Assuming the log hasn’t been tampered with, it being empty is an indication that apache has not run.

flag<0>

oh no some1 call ic3 - 25 pts

Question

It is believed this machine was used to attack another, what file proves this?

Answer

While spelunking through the image to get my bearings, I happened upon a screenshot within the home directory for ‘root’. This file is located at ‘/root/irZLAohL.jpeg’ and is reproduced below:


Notably this image contains a screenshot of a windows host, probably captured during a malicious remote access session. The filename was accepted as the flag. Further notable is that the screenshot includes the notepad window open with a flag which we had previously found in the Triage Memory questions. It’s all starting to fall into place…

flag<irZLAohL.jpeg>

scripters prevail - 25 pts

Question

Within the Documents file path, it is believed that Karen was taunting a fellow computer expert through a bash script. Who was Karen taunting?

Answer

When reviewing bash history we saw various references to bash scripts:


Reviewing that excerpt we see that the user navigated to ‘Documents’, made a directory called ‘myfirsthack’, entered that directory and then created, modified, chmod’d and executed two scripts (hellworld.sh and firstscript), they then copied firstscript to firstscript_fixed and executed it. Lets see what they contain:


Not so interesting, and:


Nope, third time is a charm?:


Here we have a reference to a ‘Young’, lets give that a go! 

flag<Young>

the who - 30 pts

Question

A user su'd to root at 11:26 multiple times. Who was it?

Answer

su events are recorded in the auth log at ‘/var/log/auth.log’, we can quickly parse this for events at that time using the following:
cat ./var/log/auth.log | grep 11:26
This gives us the following output:


And we can see that user ‘postgres’ has multiple entries that minute stating “Successful su for postgres by root”.

flag<postgres>

/ - 30 pts
Question
Based on the bash history, what is the current working directory?

Answer
Within the bash history, reviewing the last cd to an absolute path we see that the user changed directory to /root. Thereafter we can review the following cd commands to see what impact they would have on the current working directory.

Command Resultant Working Directory
cd /root /root
cd ../root /root
cd ../root/Documents/myfirsthack/../../Desktop/ /root/Desktop
cd ../Documents/myfirsthack/ /root/Documents/myfirsthack

So we see the final state is' /root/Documents/myfirsthack'

flag</root/Documents/myfirsthack>

2019-08-14

2019 Unofficial Defcon DFIR CTF Writeup - Memory Forensics

For the majority of this section I used Volatility 2.6 under Windows Subsystem for Linux (WSL). As an aside, I commonly use volatility in one of two ways. Most commonly I will run a number of common commands up front and as I progress I will run other less common commands, in each case I redirect the output of the command(s) to txt files which I can then manually review or cat/grep etc, thus reducing processing time that would arise from re-running commands. e.g:
vol.py -f [path_to_memory] --profile[profile] pslist >> [media-id]-pslist.txt
vol.py -f [path_to_memory] --profile[profile] psscan >> [media-id]-psscan.txt
vol.py -f [path_to_memory] --profile[profile] netscan >> [media-id]-netscan.txt
This approach means I can reuse output if later required in analysis. During CTFs and similar I quite often use quick and dirty commands piped to grep to narrow in on answers quickly where I don’t think I will rely upon analysis later. In such cases, a knowledge of the expected output from plugins in advance often means I can do away with the headers in output tables or I can include them with an or statement in grep e.g.:
vol.py -f [path_to_memory] --profile=[profile] pslist | grep -i 'offset\|notepad'
This requires knowledge of a unique string which can be found in the header of the output table for each plugin. In this case I know the pslist header containes ‘Offset’ and I am interested in the ‘notepad’ entry.

Grepping the output of volatility plugins is something memory forensics ninja Alissa Torres (@sibertor) covers in her SANS FOR526 class and it’s really sped up my analysis. There will be a mix of both techniques in the examples that follow.

get your volatility on – 5pts

Question

What is the SHA1 hash of triage.mem?


Answer

No fancy tools needed here a simple sha1sum, in this case using WSL, gives us the answer.

sha1sum [path_to_file]


flag<c95e8cc8c946f95a109ea8e47a6800de10a27abd>

pr0file - 10 pts

Question

What profile is the most appropriate for this machine? (ex: Win10x86_14393)

Answer

The first step in most volatility analysis is to use the ‘imageinfo’ plugin:
vol.py -f [path_to_memory] imageinfo

Reviewing the output, we can see that the plugin presents a few possible profiles, we also review the service pack level to confirm that we require an SP1 profile.


Combining that information, it is possible that a number of other profiles (e.g. Win2008R2SP1x64 or the other kernel variant profiles) would be correct, and it would likely have been possible to use any of them to confirm the exact OS by pulling registry hives from RAM. But in this case, and based on prior experience, I went with ‘Win7SP1x64’ and it was correct.

flag<Win7SP1x64>

hey, write this down - 12 pts

Question

What was the process ID of notepad.exe?

Answer

The 'pslist' command, known profile and a pipe to grep can get us this quickly:
vol.py -f Adam\ Ferrante\ -\ Triage-Memory.mem --profile= Win7SP1x64 pslist | grep -i 'offset\|notepad'

The Process ID (PID) column shows for notepad the PID is 3032.

flag<3032>

wscript can haz children - 14 pts

Question

Name the child processes of wscript.exe.

Answer

The 'pstree' command shows the relationship between parent and children processes, sometimes where there are lots of processes child to a single parent it can be a bit confusing and alternatives like explicitly looking up the PID of the parent and seeing what processed have it as a Parent Process ID (PPID) using 'pslist' (or 'psscan') is the best approach.

In this case 'pstree', the known profile and a pipe to grep with context (-C) is a nice shortcut:

vol.py -f Adam\ Ferrante\ -\ Triage-Memory.mem --profile=Win7SP1x64 pstree | grep wscript -C2

Executing this command results in the following output:


We can see the child process is UWkpjFjDzM.exe.

flag<UWkpjFjDzM.exe>

tcpip settings - 18 pts

Question

What was the IP address of the machine at the time the RAM dump was created?

Answer

There are a couple of quick ways to skin this cat, but my preference is to use netscan output as it is commonly required later, I piped this to a text file with:

vol.py -f Adam\ Ferrante\ -\ Triage-Memory.mem --profile=Win7SP1x64 netscan >> netscan.txt
Which provided the following output:


Per the above, there are multiple established connections which detail an IPv4 address of 10.0.0.101.

flag<10.0.0.101>

intel - 18 pts

Question

Based on the answer regarding to the infected PID, can you determine what the IP of the attacker was?

Answer

The infected process was the child process spawned from ‘wscript.exe’, ‘UWkpjFjDzM.exe’ or PID 3496.
We can re-review the netscan output written to netscan.txt with:
cat netscan.txt | grep -i 'offset\|UWkpjFjDzM'

Which outputs as below:


That process is associated with an established connection to '10.0.0.106':

flag<10.0.0.106>

i <3 windows dependencies - 20 pts

Question

What process name is VCRUNTIME140.dll associated with?

Answer

If you want to know something about loaded dlls, the 'dlllist' plugin is a good place to start. The output is verbose due to us not being able to focus on a single process in this question. The output is a repeating format with a header detailing process information and then a list of the associated dlls. In this case I used the following command to pass all lines which contain details of a process and also pass any instance of ‘VCRUNTIME140’:

vol.py -f Adam\ Ferrante\ -\ Triage-Memory.mem --profile=Win7SP1x64 dlllist | grep -i 'pid\|VCRUNTIME140'
Therefor for the occurance of  VCRUNTIME140 we can review the proceeding line in the output and we can conclude that this was the associated process.

To my surprise there were 5 instances associated with different processes.

While I didn’t do this at the time, a tidier approach would be to use:
vol.py -f Adam\ Ferrante\ -\ Triage-Memory.mem --profile=Win7SP1x64 dlllist | grep -i 'pid\|VCRUNTIME140' | grep -i VCRUNTIME140 -B1
This results in the following output:


Technically any of these would be a correct answer for “What process name is VCRUNTIME140.dll associated with?”, but OfficeClickToR.exe stood out as unique so I went with that first. From memory, I think I tried them all when that didn’t work, before realising that I had to drop the extension…

flag<OfficeClickToR>

mal-ware-are-you - 20 pts

Question

What is the md5 hash value the potential malware on the system?

Answer

As mentioned earlier, the potential malware is ‘UWkpjFjDzM.exe’ or PID 3496. We can dump this process to the current directory and hash it with a one liner. This is because we know the behaviour of the 'procdump' commend when it comes to naming dumped processes. We specify the output location and the filename will be ‘executable.[pid].exe’

vol.py -f Adam\ Ferrante\ -\ Triage-Memory.mem --profile=Win7SP1x64 procdump -p 3496 -D . && md5sum executable.3496.exe

My AV was unimpressed, but we managed to hash the file before it was quarantined:


flag<690ea20bc3bdfb328e23005d9a80c290>

lm-get bobs hash - 24 pts

Question

What is the LM hash of bobs account?

Answer

There is a good guide to the required process here.

To answer this question, we need to use the hashdump plugin. However, this plugin needs to be provided with the virtual address of two hives, SAM and System. We retrieve this information with the hivelist plugin:

vol.py -f Adam\ Ferrante\ -\ Triage-Memory.mem --profile=Win7SP1x64 hivelist

Resulting in the following output:


SYSTEM is at: 0xfffff8a000024010
SAM is at: 0xfffff8a000e66010

We can then use the hashdump command to dump the hashes:

vol.py -f Adam\ Ferrante\ -\ Triage-Memory.mem --profile=Win7SP1x64 hashdump -y 0xfffff8a000024010 -s 0xfffff8a000e66010


The format of the resultant output is:

<Username>:<User ID>:<LM hash>:<NT hash>:<Comment>:<Home Dir>:

As such we are interested in the LM component, so ‘aad3b435b51404eeaad3b435b51404ee’, which happens to be the LM hash of a blank password.

flag<aad3b435b51404eeaad3b435b51404ee>

vad the impaler - 25 pts

Question

What protections does the VAD node at 0xfffffa800577ba10 have?

Answer

Information on VAD notes can be returned using the ‘vadinfo’ command. Running it on its own will result in a lot of output, easily piped to a txt file for subsequent review or narrowed down with a grep with context. The firs relevant line will be the one with the VAD note location and the next 10 lines will be more than enough to answer our question:

vol.py -f Adam\ Ferrante\ -\ Triage-Memory.mem --profile=Win7SP1x64 vadinfo | grep '0xfffffa800577ba10' -A 10

This results in the following output:


And we can see the protection is ‘PAGE_READONLY’

flag<PAGE_READONLY>

more vads?! - 25 pts

Question

What protections did the VAD starting at 0x00000000033c0000 and ending at 0x00000000033dffff have?

Answer

This time we are seeking the same information but based upon start location and end location. I actually just used the same command but substituted @ value for the start location. However, this approach actually returned multiple results. It was easy enough to distinguish which I was looking for from the mess but in short, I hadn’t noticed in the question that we were talking about a historical VAD hence “What protections did the VAD”.

A cleaner way to find exactly the right answer is as follows:

vol.py -f Adam\ Ferrante\ -\ Triage-Memory.mem --profile=Win7SP1x64 vadinfo | grep '0x00000000033c0000' -A 3 | grep '0x00000000033dffff ' -A 3


flag<PAGE_NOACCESS>

vacation bible school - 25 pts

Question

There was a VBS script run on the machine. What is the name of the script? (submit without file extension)

Answer

I expect there are a number of ways to answer this one, and I tried a few possibilities which didn’t get me to the answer. Ultimately the ‘cmdline’ solved it for me but it may not be the most elegant answer. If a VBS script had been executed via the command line then I would have expected there to be evidence here.

As it was a search for vbs entries within here actually identified that the process wscript.exe (PID 5116) had been executed with the command line detailed below:


flag<vhjReUDEuumrX>

thx microsoft - 25 pts

Question

An application was run at 2019-03-07 23:06:58 UTC, what is the name of the program? (Include extension)

Answer

The shimcache is one of many handy ways to evidence process execution and there is a volatility plugin to parse it from memory, the following query immediately gave the process executed at that time:

vol.py -f Adam\ Ferrante\ -\ Triage-Memory.mem --profile=Win7SP1x64 shimcache | grep '23:06:58'

Resulting in:


So we see that Skype executed at the time in question.

flag<Skype.exe>

lightbulb moment - 35 pts

Question

What was written in notepad.exe in the time of the memory dump?

Answer

There is a ‘notepad’ plugin for Volatility however it only supports XP/2003, so we have to do this manually. Fortunaltely being a common challenge there are a few handy guides out there, including the one located here.

Earlier in ‘hey, write this down’, we identified that the PID assoaicted with notepad.exe is 3032, as such we can dump the process memory with:

vol.py -f Adam\ Ferrante\ -\ Triage-Memory.mem --profile=Win7SP1x64 memdump -D dump -p 3032

We can then run strings over the dumped memory and as a first Hail Mary use grep to parse the output for any string containing ‘flag<’, just in case the challenge author has been kind.

And they have:


Note that the command used, per the guide linked above, is strings with the ‘-e l’ flag to set it to 16-bit littleendian, as this is how notepad stores content.

flag<REDBULL_IS_LIFE>

8675309 - 35 pts

Question

What is the shortname of the file at file record 59045?

Answer

The ‘mftparser’ plugin is very useful and I had already run it while looking to solve some of the other challenges. Due to the volume of information returned, run time and how often the content gets returned to I piped the output of the command to a text file.

A search of the file for the string ‘59045’ had 2 results, one of which was the relevant one.


In the screenshot we can quickly see that the short filename associated with this record was ‘EMPLOY~1.XLS’.

flag<EMPLOY~1.XLS>

whats-a-metasploit? - 50 pts

Question

This box was exploited and is running meterpreter. What PID was infected?

Answer

This was a bit of a gimme. Earlier in ‘wscript can haz children’ we identified a malicious process and then in ‘intel’ we used netscan to see what it was communicating with. I noted at the time that it was communicating on port ‘4444’ which will be known to many as the default port for metasploit.

The PID associated with this process was ‘3496’ and lo and behold, it was accepted as the correct answer.

flag<3496>