
Windows Server Data Dedupliction and Forensic Analysis

In starting to write on this topic I had intended to share a concise guide on my recommended methodology for handling disk images which contain Windows Server Data Deduplication, however as I delved a little deeper into research my inaugural post started to get a little unwieldy. I have split the original post into two parts, this first post serves as an introduction to Data Deduplication and speaks to how to identify whether a system or disk image has Data Deduplication enabled. If you already have a disk image and want to jump straight into how to extract the deduplicated data please head over to the second post in this series, Forensic Analysis of Volumes with Data Deduplication.
What is Data Deduplication
The Data Deduplication ('Dedupe') I am referring to in this post is specifically the Microsoft Server feature, while other similar technologies exist in other operating systems and for different filesystems these are not addressed here. Since Windows Server 2012 Microsoft has provided system administrators the option to enable Data Deduplication, which to paraphrase their description, is designed to assist in the reduction of costs associated with duplicated data. When enabled, "duplicate portions of the volume's dataset are stored once and are (optionally) compressed for additional savings".
The Dedupe feature shouldn't be confused with the Single-Instance Storage ('SIS') feature which was made available in Windows Storage Server 2008 R2 and could be found in Exchange Server previous to then; I may address SIS in a subsequent post.
There are a multitude of Microsoft and Third-Party resources which describe the functionality of Dedupe, a few good primers are available here (Server 2012), here (Server 2016) and here (Server 2012, 2016 and other deduplication technologies).
The key takeaways as they impact forensic analysis are as follows:
- Data Duplication cannot be enabled on the system or boot volumes and as such, in many investigations - particularly IR, the presence of Dedupe may not impact much of the analysis.
- By default Data Duplication will not impact certain filetypes and additional custom exclusions can be added/defined when the administrator enables the feature.
- It works below file level, deduplicating chunks of files rather than whole files and unique chunks are stored in the Chunk Store.
- Chunks stored in the Chunk Store can be compressed, again there is a default and customisable exclusion list. This will impact keyword searching and file examination in tools which are not Dedupe-aware (SPOILER ALERT: None of the major forensic tools are currently capable of processing Data Deduplication natively).
- Original file streams are replaced with a reparse points to the chunk store. Notably, these files are initially written to disk as per usual and then deduplicated on a scheduled basis with the original files being deleted, this introduces the possibility that the original files may be recoverable via traditional carving.
The Problem with Data Deduplication
While Dedupe has been available since Windows Server 2012, I was essentially unaware of it until mid-2017 when a colleague encountered it during a case which revolved around multiple Windows Server 2016 systems, many of which had the feature enabled. When conducting AV scans of the imaged physical disks a huge number of errors occurred relating to files being inaccessible. When these errors were explored it was identified that the files at each location were not in fact files, but reparse points.
The same issue arises when attempting to analyse a disk image which contains deduplicated data in forensic tools, carve data or keyword search. At the time of writing, and to the best of my knowledge, none of the major forensic suites recognise or handle Dedupe, likewise if one were to simply connect a drive to a computer system running a different operating system, or even the same operating system without the feature enabled the files would be unreadable.
My default position when capturing images of physical systems is to take a full physical disk image, and possibly a secondary logical image of the key volumes if the system is live and known to have Full Disk Encryption. Likewise, when acquiring virtual servers, it is often easier and more forensically sound to be provided with copies of full flat VMDKs or VHDs than to perform live imaging within the virtual environment. As such, it is easy to come away with images which contain deduplicated data without realising it, especially if you don't explicitly check or ask the system owner at the time of acquisition.
How to check for Data Deduplication
If you approach a live system and you need to determine whether data deduplication is enabled on any of its volumes you can achieve this in a number of ways. The simplest way is to review the configuration within Server Manager.
In Server Manager, under File and Storage Services, and Volumes you can review the available volumes. Per the below screenshot any volume with active data deduplication will display a non-zero 'Deduplication Rate' and 'Deduplication Saving', as per the below screenshot:

If Data Deduplication is either not enabled or not installed then the same columns appear, however they will contain no values:

We can also check for the presence of dedupe via PowerShell. If we attempt to execute the PowerShell command 'Get-DedupeStatus' the output will tell us whether Dedupe is enabled on any volumes.
In the event that the Dedupe feature is not installed you will receive an error indicating that "the term 'Get-DedupStatus' is not recognised as the name of a cmdlet, function, script file, or operable program". This is because PowerShell cmdlets associated with optional features are only installed when those optional features are installed (in most cases). An example of the error you can expect is provided in the screenshot below:

If the data deduplication feature is installed, but not currently enabled on any volumes, you will return to the prompt without any further output (as below):

If it is installed and enabled you will receive output as below, this screenshot indicates that it is enabled on the E: volume:

Granted, relying upon the presence or absence of errors to confirm the system configuration is a little inelegant. If you wish to double check whether Data Deduplication feature is currently installed, this can be confirmed with:
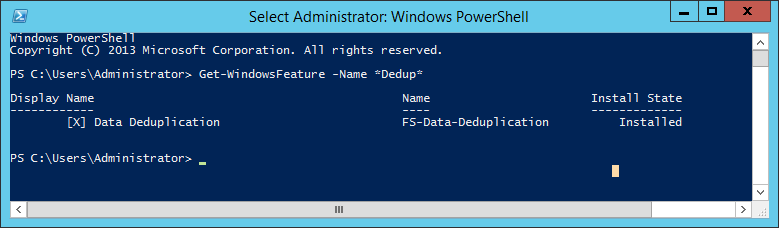
Get-WindowsFeature -Name *Dedup*
This command will return all Windows Features for that OS containing "dedup" in their Name, such as ‘FS-Data-Deduplication’, and indicate their status. In the below screenshots the absence of an 'X' inside the square brackets and the 'Install State' of 'Available' confirm the feature is not currently installed and the presence of an 'X' and an 'Install State' of 'Installed'... should be self-explanatory.
Get-WindowsFeature -Name Dedup output where Data Deduplication IS NOT enabled:
Get-WindowsFeature -Name Dedup output where Data Deduplication IS enabled
The same can be confirmed within the warmth and comfort of a GUI by reviewing the configuration in the 'Add Roles and Features' Wizard. From the Add Roles and Features Wizard, under Server Roles, File and Storage Services, File and iSCSI Services you will find the checkbox for Data Deduplication. If its Checked, it's installed.
Checking a Disk Image for Data Deduplication
But what if you didn't check in advance for data deduplication and you already have an image which you believe may contain deduplicated data. Fear not, a brief examination of the image will allow you to determine whether dedupe was enabled.
Most obviously, and the way many will stumble across the issue is through examining the data files contained on the drive. Unfortunately, it is easy to miss unless you actually review individual files.
Autopsy, EnCase, FTK, X-Ways and indeed Windows Explorer do little to warn you in advance that the data presented is not as it seems. Within Autopsy the default table view does little to indicate that the files are anything other than regular files. The filename, extension and metadata associated with the file are displayed as consistent with the true underlying file, and indeed the values at they appear in the MFT, but when a file is selected the Hex view would seem to indicate that the file at that location is zero filled:

A review of the 'File Metadata' tab does highlight that the deduplicated files have the SI Attribute 'Reparse Point' flag set, but it isn't immediately obvious when taking a cursory review.

Things can become a little clearer depending on your processing options. If you enable the Extension Mismatch Detection processing option the files which have been deduplicated will be flagged as their content does not match their extension. Likewise, errors in processing compound files may serve as an additional warning.
EnCase is similar in that the files present as Zero-filled when viewed in hex view. Within Table Pane the tell-tale signs are the fact that EnCase does not specify a starting extent for the deduplicated files and notes them to be Symbolic Links (Sym Link) in the Description column. Additionally, depending on the processing options you enable, the reparse points will not have the Signature Analysis, File Type, MD5, SHA1 or Entropy columns populated while regular files will.

Similar behaviour is observed within FTK, FTK Imager and X-Ways. Notably, FTK Imager, due to its limited data displayed in the default view actually makes the files stand out somewhat more as it assigns the value of 'Reparse Point' within the Type column as opposed to 'Regular File'.

X-Ways Forensics will highlight the reparse points in blue when the ‘Verify file types with signatures and algorithms’ processing option is enabled as it highlights the fact that the file signature does not match the extension.

It is also worth noting that when an image or a drive containing Deduplicted data is presented to a Windows OS which is not "Dedupe Aware", and browsed in Windows Explorer there is nothing to indicate that anything is amiss until one attempts to access the data. The below screenshot is of a VMDK containing Deduplicated data presented to Windows 10 using FTK Imager’s ‘Mount Image’ function.

Only once you try to access the files do you start to receive errors, the specific error will depend on the application associated with each filetype, some examples are provided below:

When performing a check of files in this manner in an attempt to identify whether data deduplication is in use the following things should be noted:
- Even when Data Deduplication is enabled files under a certain size will not be deduplicated, specifically files under 32kb.
- Certain filetypes can be excluded from deduplication, and file exclusions are configurable by the system administrator.
- It is possible for a volume to have a mix of deduplicated and duplicated data of the same filetype and size. The process of deduplicating files is referred to as 'optimizing' in Microsoft vernacular and by default files are only 'optimized' after they are a certain number of days old on disk. By default this is 3 days, but it is configurable.
- It is further possible for a volume to have a mix of deduplicated and duplicated data as a result of failed or incomplete unoptimization. Unoptimization is covered in more detail in the Unoptimization section below.
- Deduplication can be enabled on some volumes and not others, as such just because it is not employed on one volume doesn't mean it isn't used on another.
Evidently, while performing a spot check review of the data is certainly the quickest and dirtiest approach to identifying whether data deduplication is at play, it is hardly fool proof. In any event, we are forensicators and if we want to understand the configuration and settings of a Windows host there is nowhere we would rather be than knees deep in the registry.
A simple regshot before and after configuration changes is commonly the quickest way to test for and identify useful forensic artifacts. This was employed to compare the registry between a fresh OS install, just after installation of the data deduplication feature and subsequently after enabling data deduplication for one volume in both Server 2012 and 2016, in an effort to identify the which would speak to whether deduplication was installed and enabled.
The first point to note is that installation of the deduplication feature in Server 2012 resulted in the creation of 85525 registry keys, the addition of 322778 new values and the deletion of 2 values. Full disclosure: I have not reviewed all of these. With that said a cursory review identified a number of notable additions, specifically:
HKLM\SYSTEM\CurrentControlSet\Services\ddpsvc
HKLM\SYSTEM\CurrentControlSet\Services\ddpvssvc
HKLM\SYSTEM\CurrentControlSet\Services\Dedup
The presence of these Registry keys indicates that the 'Data Deduplication' feature has been installed. If the feature is subsequently uninstalled these keys are deleted. The fact that this feature has been installed doesn't of course mean that it has been enabled on any volume however it is a key indication that caution is advisable.
When Data Deduplication has been enabled for a volume a registry key is created at:
HKLM\SYSTEM\CurrentControlSet\Services\ddpsvc\PerfTrace
This key is populated with subkeys related to the volumes for which Dedupe has been enabled e.g. when the E volume had it enabled a subkey is created at:
HKLM\SYSTEM\CurrentControlSet\Services\ddpsvc\PerfTrace\E__volume
While there are technical differences between the implementation of Data Deduplication between Server 2012 and Server 2016, the first obvious difference during analysis comes when examining the registry. When data deduplication is enabled in Server 2012 a single subkey is created for each volume, as per the screenshot below:

When the same change is enabled within Server 2016 we see two subkeys created for each volume which has Data Deduplication enabled, the same '[VOLUME_LETTER]__volume' key and a further ____[volume_letter]___ key:

The presence of these Registry keys indicates that the Data Deduplication feature has been enabled for the volumes which are referenced in the key name. It should be noted however, that if Data Deduplication is then disabled and the volumes 'Unoptimized', the keys persist. Further analysis is required to identify a reliable artifact which can be examined to determine whether and where Dedupe is enabled.
Credit must go to the to the venerable Charlotte Hammond (@gh0stp0p) who took one look at this question and suggested “it might be worth looking at the file paths and location of the ChunkStore and other related directories”, and as per usual she was right.
When Data Deduplication is enabled for a volume, a ‘Dedup’ directory is created under the System Volume Information. This directory contains lots of useful information including the Chunk Store (evidence of which is enough to indicate that Data Decryption is enabled for the volume). When data deduplication is disabled for a volume the entire 'Dedup' directory and contents are deleted, per the below screenshot:
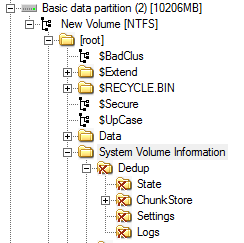
As such, if you find an active 'Dedup' directory within the SVI on any volume this is an indication that the Volume likely has Data Deduplication enabled. What's more, the 'Dedup' folder contains a wealth of interesting information. It was beyond the scope of this research to delve into the full contents in depth, however a few notable observations and artefacts are detailed below.
The Dedup directory contains the chunk store itself, log data as well as notable configuration and state files such as [root]\System Volume Information\Dedup\Settings\dedupConfig.01.xml, a screenshot of which is provided below:

dedupConfig.01.xml appears to contain Data Deduplication configuration information specific to that volume. The properties appear to be fairly self-explanatory however I did not perform testing to confirm how the property values tie to configuration changes.
Further notable files were identified within ‘[root]\System Volume Information\Dedup\State’ specifically:
chunkStoreStatistics.xml
dedupStatistics.xml
optimizationState.xml
unoptimizationState.xml
chunkStoreStatistics.xml

chunkStoreStatistics.xml appears to contain information regarding , amongst other things, the chunk store size.
dedupStatistics.xml

dedupStatistics.xml in a dramatic turn of events appears to contain statistics relating to Dedup.
optimizationState.xml

unoptimizationState.xml

( Note:the volume examined had been optimised and unoptimized multiple times)
Unoptimization
Once a volume has been optimized (deduplicated) it can of course be unoptimized (why Microsoft didn’t settle on dededuplicated as a term of reference I will never understand). In simple terms, assuming there is adequate space on a volume the process of deduplication can be reversed and the reparse points will be replaced with full rehydrated files.
In a limited set of circumstances, it may be conceivable that unoptimizing a volume prior to acquisition may be a solution to afford access to the data, however in a live environment or business critical system this process will create a performance hit.
There are a myriad of reasons I would not advise doing this in the context of any investigation including but not limited to the loss of recoverable deleted data as additional freespace is overwritten and the fact that the methodology is not defensible when alternatives exist. This is covered in more detail within my follow up blog post here.
With that said, a volume can be Unoptimized with the following PowerShell command:
Start-DedupJob [volume] -Type Unoptimization
This command will unoptimize the data on the volume and then disable Data Deduplication for that volume
One issue with unoptimization is that it is possible that a volume may contain more deduplicated data than could be stored in a duplicated state. This will be especially likely in volumes with limited free space or a high level of duplication. During testing, I filled a volume with duplicated data, enabled Data Deduplication and then added more of the same data. I anticipated that when unoptimization was attempted it would error out either before starting or after it ran out of space.
Much to my surprise, the Unoptimization job completed, seemingly without error. When I then reviewed the drive in Windows Explorer I found it to be completely full:

Furthermore, the result of the Get-DedupStatus command indicated that a reduced number of files were now considered “InPolicy” and that they were still optimized:

When I then viewed the volume in EnCase I was able to confirm that some of the reparse points had now been replaced with rehydrated files and some still existed. All data was still accessible via Windows Explorer in the Host OS.
The key takeaway from this is that an unoptimize job can and will fail to complete if it runs out of space within the volume, however it does not necessarily alert the user to this fact. A review of the Get-DedupStatus output following an Unoptimize job will confirm whether Data Deduplication is still enabled.
Additionally, reviewing the Get-DedupStatus output for any volume you plan to Unoptimize prior to attempt it is advisable. If the SavedSpace exceeds the Free Space then the drive cannot be fully Unoptimized.
Other supported Operating Systems
While not a supported feature it should also be noted that users have identified methods to enable the Deduplicate Data feature within Desktop OSs, including Windows 8, 8.1 and 10. It's probably unlikely you will stumble across any such system during your day to day investigations however it is worth being aware of.
Details of the methodology employed for are available at Teh Wei King's blog for both Windows 8 and Windows 8.1. Some details regarding enabling this feature within Windows 10 is available here.
Forensic Acquisition of volume with Data Deduplication
Hopefully this post has provided some useful information regarding the Data Deduplication feature and provided resources for further reading where required. The second post in this series will deal with methods to extract deduplicated data, that post can be found here.
Commands used in testing
If you wish to validate any of the performed steps and statements, the following PowerShell commands were key in setting up my test environment:
Install-WindowsFeature -Name FS-Data-Deduplication
Installs the Data Deduplication Feature in Windows Server 2012/2016
Enable-DedupVolume -Volume e: -UsageType Default
Enables Data Deduplication for volume e: with default settings
Set-Dedupvolume E: -MinimumFileAgeDays 0
Reduces the Minimum File Age requirement to 0 days from default value of 3 (useful for testing)
Start-DedupJob E: -Type Optimization
Initiates a manual Optimization job rather than waiting for a scheduled job
Start-DedupJob E: -Type Unoptimization
Command to Unoptimize a volume
Hopefully the above is useful to anyone who finds themselves up against the same issue. If you get this far and it's been helpful please let me know by leaving a comment or fire me a tweet. Comments, criticism and corrections all welcome too.